Working with repositories and remotes
Use VS Code to connect a local Git repository to a remote, review incoming commits, and share your work. Choose the task that matches your repository:
| Task | Start here |
|---|---|
| Get a local copy of an existing remote repository | Clone repositories |
| Create a GitHub repository for a local project | Publish to GitHub |
| Connect a local repository to an existing remote | Add a remote |
| Download or upload commits | Choose between fetch, pull, push, and sync |
| Choose which repository an action applies to | Working with repositories |
If you haven't set up Git yet, start with the source control quickstart. If an operation fails, see source control troubleshooting.
Understanding remotes
A remote is a named connection to another Git repository, often hosted on a service such as GitHub, Azure DevOps, or GitLab. It identifies where to retrieve or share commits.
When you clone a repository, Git automatically creates a remote named origin that points to the original repository. You can work with multiple remotes if you need to interact with different servers or repositories.
Working with remotes involves three main operations:
-
Fetch: downloads commits from the remote without changing your working files. This lets you see what others have done without merging their changes into your work.
-
Pull: fetches remote commits and integrates them into your current branch. Git can fast-forward, merge, or rebase, depending on your history and Git configuration. Pull can change your working files and require conflict resolution.
-
Push: uploads your local commits to the remote so others can access your changes. It doesn't upload uncommitted changes or pull remote commits.

The diagram illustrates a pull that merges. A pull configured to rebase integrates the fetched commits by replaying local commits instead.
An upstream branch associates your local branch with a branch on a remote. VS Code uses this association for pull, push, and sync, and to show incoming and outgoing commit counts. If your branch has no upstream, pushing prompts you to publish the branch. Publishing a branch pushes its commits and sets its upstream.
Add a remote
To add a new remote to your repository:
-
In the Source Control view (⌃⇧G (Windows, Linux Ctrl+Shift+G)), select More Actions (...) > Remotes > Add Remote.
Alternatively, run the Git: Add Remote command from the Command Palette (⇧⌘P (Windows, Linux Ctrl+Shift+P)).
-
Enter the remote URL.
-
Enter a name for the remote (for example,
originfor your first remote orupstreamfor the original repository of a fork).
Your repository now has a remote that you can fetch from or push to. Adding a remote doesn't upload commits or set an upstream branch. Use Push to publish a local branch when you're ready to share it.
Use Git: Remove Remote to remove the connection from your local repository. Removing a remote doesn't delete the hosted repository or your local commits.
Clone repositories
Cloning creates a local copy of a remote repository on your machine. The cloned repository includes all branches, commits, and history from the remote. By default, Git configures a remote named origin pointing to the URL you cloned from.
To clone a repository, run the Git: Clone command in the Command Palette (⇧⌘P (Windows, Linux Ctrl+Shift+P)), or select the Clone Repository button in the Source Control view.
Enter the repository URL. To browse repositories on GitHub, select Clone from GitHub, sign in when prompted, and choose a repository from the list. Cloning a public repository by URL doesn't generally require signing in.
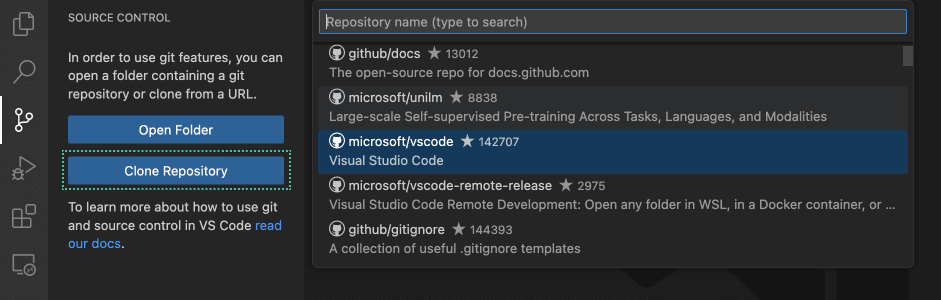
When cloning, VS Code asks you to select a local folder to store the repository. After cloning, you can choose to open the cloned repository in a new window.
Cloning doesn't grant write permission. To push changes, use a repository you can write to or create a fork. Review the Workspace Trust prompt before trusting code from another source.
The GitHub Pull Requests and Issues extension enhances the GitHub integration with pull request and issue management. Learn more about working with GitHub in VS Code.
Publish to GitHub
If you have a local repository that isn't connected to a remote, you can publish it directly to GitHub from VS Code.
To publish a repository to GitHub:
-
Open the Command Palette (⇧⌘P (Windows, Linux Ctrl+Shift+P)) and run Publish to GitHub.
-
Sign in to GitHub if prompted.
-
Enter an available repository name and choose whether to create a public or private repository.
-
If prompted, select which files to include in the initial commit.
VS Code creates a new repository on GitHub, adds it as a remote, and pushes your commits.
Publish to GitHub creates a new hosted repository. Publish Branch uploads a branch to an existing remote and sets its upstream. If the hosted repository already exists, add it as a remote instead of creating another repository.
Push, pull, and sync
Choose an operation based on whether you want to inspect, integrate, or share commits:
| Goal | Operation | Effect |
|---|---|---|
| Check what changed on the remote | Fetch | Updates remote-tracking branches without changing your current branch or working files. |
| Bring remote commits into your current branch | Pull | Fetches and integrates commits locally. Doesn't upload your commits. |
| Share commits you've made locally | Push | Updates the remote branch. Doesn't pull or integrate remote changes. |
| Integrate remote commits, then share local commits | Sync | Pulls first, then pushes. Can change both your local branch and the remote branch. |
If you have multiple repositories open, select the intended repository before running an action.
Push commits
Pushing uploads your local commits to the remote repository. To push commits:
-
Select More Actions (...) > Push in the Source Control view.
To choose a specific remote, run Git: Push to... from the Command Palette (⇧⌘P (Windows, Linux Ctrl+Shift+P)).
You can also push your local commits by using the Push icon in the Source Control Graph view toolbar.
-
If prompted, sign in to authenticate with the remote.
Your commits are uploaded to the remote branch. Other team members can now pull your changes.
If the push is rejected because the remote has commits you don't have locally, follow the steps for a non-fast-forward push rejection. Don't force push to bypass the rejection.
If your branch doesn't have an upstream configured, VS Code prompts you to publish the branch first.
Pull commits
Pulling fetches remote commits and integrates them into your current branch. Before pulling, commit your changes or stash unfinished work so Git doesn't stop because your local changes would be overwritten.
To pull commits, select More Actions (...) > Pull in the Source Control view. To choose a specific remote and branch, run Git: Pull from... from the Command Palette. You can also use the Pull icon in the Source Control Graph toolbar.
Git fast-forwards or merges the incoming commits unless your Git configuration specifies rebase or another pull strategy. If Git asks you to choose how to reconcile divergent branches, use your team's merge or rebase workflow.
After a successful pull, your branch contains the incoming commits. If conflicts stop the operation, resolve the conflicts and complete the merge or rebase. Pull doesn't push your local commits.
Pull with rebase
Use rebase when your team expects a linear history and your local commits haven't been shared:
- Run Git: Pull (Rebase) from the Command Palette.
Git fetches the remote commits, then replays your local commits on top of them. If conflicts stop the rebase, resolve them and continue the operation.
Rebase rewrites commit history. Avoid rebasing commits others are already using unless you've agreed on how to update the shared branch.
Learn more about Git rebase.
Sync changes
Sync first pulls changes from the upstream branch, then pushes your outgoing commits. Use sync only when you intend to do both. Use Push to upload without pulling, Pull to integrate without uploading, or Fetch to inspect incoming changes without changing your working files.
If conflicts stop the pull, sync doesn't proceed to the push. Complete the operation, then push when you're ready to share the result.
To sync changes:
- Select Sync Changes in the Source Control view.
- Select the sync icon in the Status Bar.

The Status Bar sync indicator shows outgoing (↑) and incoming (↓) commits relative to the upstream branch. For example, ↑2 ↓1 means two outgoing commits and one incoming commit. These counts reflect the last known remote state. Fetch to check for newer remote commits.
Configure the git.confirmSync setting to control whether VS Code asks for confirmation before syncing.
Fetch commits
Fetching downloads commits from the remote repository without merging them into your local branch. This lets you review incoming changes before integrating them.
To fetch commits, select More Actions (...) > Fetch in the Source Control view. For other fetch options, use the Command Palette:
- Run Git: Fetch From All Remotes to fetch from all configured remotes.
- Run Git: Fetch (Prune) to also remove local remote-tracking references for branches deleted on the remote. This doesn't delete local branches. To always prune when fetching, use the git.pruneOnFetch setting.
After fetching, review incoming commits in the Source Control Graph before integrating them with Pull.
To automatically fetch commits in the background, use the git.autofetch setting. It is off by default in the editor window and on by default in the Agents window. To configure the fetch interval, use the git.autofetchPeriod setting (default 180 seconds). Automatic fetch doesn't pull or push.
Status Bar sync actions
The Status Bar provides quick access to common repository and remote operations without opening the Source Control view.
Branch indicator
The lower-left corner contains the branch indicator and a separate sync or publish action:
- Current branch name: select to switch branches.
- Sync status: shows incoming (↓) and outgoing (↑) counts. Select the sync action to pull, then push.
- Publishing state: shows Publish Branch when the current branch has no upstream. Select it to publish the branch.

The sync icon (rotating arrows) runs both operations. For push-only or pull-only actions, use the Source Control view or Command Palette instead.
Configure Source Control actions
These settings affect the Source Control view and notifications, not the Status Bar indicators:
- git.showActionButton : control whether commit, publish, and sync action buttons appear in the Source Control view.
- git.showCommitInput : show or hide the commit message input in the Source Control view.
- git.showPushSuccessNotification : show a notification after a successful push.
Review incoming and outgoing history
The Source Control Graph shows how your current branch differs from its upstream branch. Use it to inspect incoming commits before you pull and outgoing commits before you push.
Learn more about viewing commits and branch history in the Source Control Graph.
Working with repositories
The Repositories view enables you to manage multiple Git repositories in a single workspace. This is useful when working with projects that span multiple repositories. The Repositories view also shows Git worktrees associated with your repositories.

To show the Repositories view, run the Source Control: Focus on Repositories View command from the Command Palette (⇧⌘P (Windows, Linux Ctrl+Shift+P)). Configure the scm.alwaysShowRepositories setting to always show the Repositories view in the Source Control view.
For each repository, you can see the active branch, sync status, and access actions like fetch, pull, push, and more.
Detected repositories appear in the Repositories view when you open a workspace that contains them. Before staging, committing, or synchronizing, check the repository name and branch to ensure the action applies to the intended checkout.
Repository selection modes
If you prefer to focus on a single repository or worktree at a time, you can switch to single repository mode. In that mode, you only see the changes and graph for the selected repository. When operating in multi-repo mode, the Source Control view shows changes across all repositories. Use the scm.repositories.selectionMode setting to switch between multi-repo and single-repo modes.
Credential helpers
Credential helpers securely store your authentication credentials so you don't have to enter them every time you push or pull. You should set up a credential helper to avoid getting asked for credentials every time VS Code interacts with a remote repository.
Next steps
- Create a branch to keep your next change separate from other work.
- Create a GitHub pull request to get feedback on a published branch.
- Troubleshoot source control if a remote operation fails or stalls.